tirsdag 21. april 2015

Qunari cosplay from Dragon Age Inquisition

Cosplay inspiration just creeps up on you. My sister, Bettcanard, does these monthly makeups and then she made an amazing Elf Inquisitor from Dragon Age Inquisition. 
Photo: Rojano Photo 

It looked so good I begged her to put it on again (and we are talking four hours of makeup and dressing). But she agreed and I made a Qunari so we could get some photos together. 

This were a really fast cosplay, because we decided that we were gonna do this like two days before a convention. So I used what I have and what I know - recycle :D

Most Qunari designs I looked at showed their tummy, I don't really do that (comfort zone and such). But I was working on a Lady Sif corset at the time which works both in colors and aesthetics for Qunari armor. For more about hoe I make corset take a look here

I had the necklace from my Morrigan costume already, see here for how that was made. For shoulder armor I folded black fabric and sewed it together in an overlapping pattern. The chest bind were also just black fabric with gold bias tape draped around by chest. (no pattern, just trial and error) 


A costume is in the details ;) The Inquisition emblem was a house warming gift from Karin Olava - Now used to hold my sash together. I also borrowed her staff for this cosplay, which just happened to be in my apartment (still is). So much easier to pose when you have a prop.  

My sister had a white wig from a Kida cosplay which she let me restyle as I felt like.  

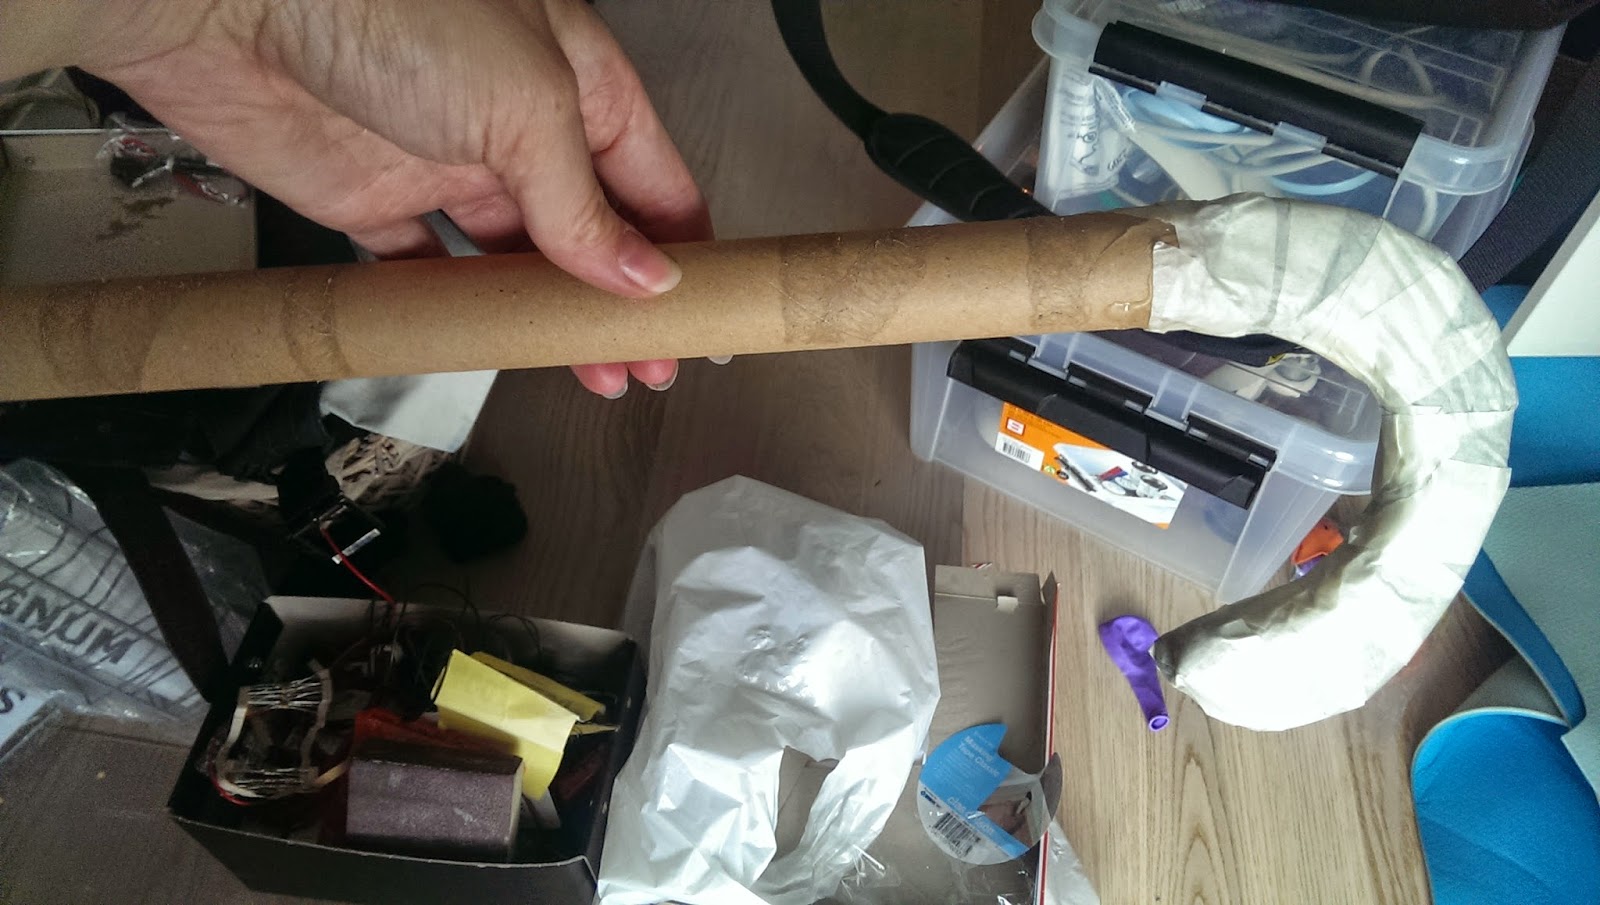
 The only new thing for this cosplay was the horns (and the makeup). The horns are made from tin foil wrapped with masking tape and then the details were added with a glue gun. I used a sponge to to the gradient effect from light to dark grey. Here is another tutorial for how to make horns

And I had such a fin time cosplaying together with my sister :D
Photo: Rojano Photo 


I must show you more photos of this awesome makeup


mandag 20. april 2015

Cardboard props - Crossbow

Before I made the Demon Hunter cosplay I made a test crossbow out of cardboard to get to know the design. Which I again could use with my Dragon Warrior. 

I started with some cardboard and foam. 

To even out the shape I covered it all in tin foil. 


Then it is time for cardboard again. Layers folded around the base. 


The skull ornament is made from paper clay. Same goes for the tips of the bow. 


Foam and tape makes the handle and the core of my tin foil roll makes out the shaft. (I later shortened the handle as it looked too much like an umbrella handle)


The shaft was also covered with cardboard scales. And I had to add a few LED for the eyes and mouth. 


Next up painting and detailing. The arrow is made out of a chopstick, the head out of cardboard. Feathers were glued to the end of the arrow :)

The entire bow was painted metallic grey and weathered using dark acrylic paint. The string is only and elastic band.


The handle is foam with cardboard for support, then covered in faux leather. 


søndag 19. april 2015

Runestaff of Nordrassil

For the Frostfire Regalia costume I build for koogco.no I also made a staff and decided on the Runestaff of Nordrassil. 

This is a walkthrough of how I made the staff, see here for tutorial on the rest of the costume

As usual I started with a cardboard tube. 

Since i knew I would have to hide a battery and still be able to change it, I made a way to unscrew the bottom of the staff. This I did by adding a bottle to the end, and attaching the endpiece to the cork. 

The endpiece is quite larger than the cork so I build up using the rest of my bottle and padding it with foam. 

After the volume is created I start with tin foil and clay to build up the shape of the ornamented endpiece. 

All shaped out, ready for sanding. 

Since this piece would be the resting point of the staff (eg. touching the floor and holdeing the weight) I covered it with worbla to make it more durable. 

Lights!
With the bottle mechanism in plase I can now start addind lights. 

The staff will have three small gems sticking out in the middle, a glowing orb and a orange gem on the top. Here are the placements of the lights befor adding the bling. 

The three smaller gems are just made from hotglue packed around the LED. This will diffuse the light. You can also use polymorph or a resin gem, but this was a fast and easy way to get them in place. 


The glowing orb is made from an acrylic sphere which I sanded down to diffuse the lights inside. I used a dremel to cut out holes so it will fit to the staff base. 

Light test without paint. 

To get the color and pattern I painted the orb on the inside with acrylic paint and used a marker for the symbols. 


More light tests in dark and light room. 


The last gem was made from a resin cast. I used a two part silicon putty to make mold of a generic diamond shape. Then I used Crystal clear resin to cast a flat gem shape. 


Staff skeleton. 
With foam I build up the basic shape of the staff. 

Tin foil and clay was used to make some of the more defined parts. These were sanded down and covered in worbla. 


When the body of the staff was ready every detail were covered with worbla. This makes it much easier to add more worbla details later (as worbla glues to itself very well). And make the staff itself more sturdy. 

Here I have base painted the staff in a brown base color using acrylic paint. 


With a vintage gold paint and a sponge I slowly add details to the top. The gem is painted red with glass paint from the back side. 


And with blue, grey and silver paint I added the rest of the details. 

The stem of the staff has a wood texture. This is created with glue from a hot glue gun. Strips of blue cloth were added. 

And the finished staff.